

Trending
The aperture is a physical part of the lens attached to your camera. Whether you have a DSLR or SLR (cameras that require you to attach lenses to them) or you use a "point and shoot" camera (a camera that has a lens built in and cannot be removed or changed), an aperture is controlling the amount of light that enters the camera and hits the sensor. Now, if you're using a smartphone, you do have an aperture, but it's only going to be f/2 or f/2.4 and the reason why is because most photos taken with a smart phone are selfies or close portrait type shots and having a blurred background makes for a much better portrait than having everything in sharp focus. Don't worry, I'll explain that more very soon.
The aperture is made up of blades that come together to form a circle in the center of your lens. When you adjust the aperture, you are moving the blades to make the circle larger or smaller. On your camera, you will see the "F Stop" number related to the aperture. This number will be something like 1.4, 2, 2.8, 5.6, 8, 11, 18, 22, etc. Here's the confusing part for a beginning photo enthusiast, the smaller the number, the larger the circle opening in your lens. In this case, 1.4 would be the biggest opening and the most light that you can allow into your camera. The 22 would be the smallest opening and the smallest amount of light. You'll also see that lenses often have an aperture number on them next to their focal length. For example, I have a lens that is 50mm/1.8. This means that the largest aperture that you can achieve on this lens is 1.8. Other lenses will have two numbers on them, such as 55-300mm/4.5-5.6 which means as you zoom from 50mms to 300mms the largest aperture you can get is 4.5 at the 50mm and 5.6 at the 300mm. Not all zoom lenses have a variable aperture, some of the more expensive ones will maintain a constant aperture at all zoom ranges. We'll get more into lenses in another edition. For right now, just know that the opening in the aperture controls the amount of light that enters the camera.
When you set the camera at the smallest number (largest aperture opening) then you can shoot at faster shutter speeds to get the best exposure. Therefore, it is often called a "fast lens" when it has a very small number. Here's an example, I'm sitting in a well lit room writing this article and I just picked up my camera and focused on the desk. With the aperture at f/2.8 my camera requires a shutter speed of 1/60th of a second to properly expose the shot. When I change the aperture to f/22 the camera now requires a shutter speed of one full second to expose the same shot. One second is much slower than 1/60th of a second so the smaller number allows me to shoot at a faster speed. This is also a great example of how changing one part of the exposure triangle requires that you must change one of the other two functions to properly expose the shot.
What else happens when you change the aperture? Your depth of field changes. When you are shooting at a larger aperture (f/2.8) your depth of field is smaller. When you are shooting at a smaller aperture (f/22) your depth of field is much greater. Depth of field is the amount of the scene that is in focus. In the photo of my son, Ethan, I shot him at f/4 which meant that only he was in focus and the background is all blurry and out of focus. If there were objects between us, then the objects closer to me would have also been out of focus. If I was shooting this same photo with f/22 then the depth of field would be greater and all the trees in the background would be in focus and the scene would look flat and he would be lost in the scene. The blurring in the background is known as "bokeh" (pronounced bow-kuh).
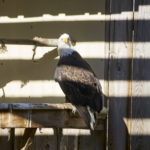
Here's another cool trick that the aperture will allow you to do. The blurring of the foreground can actually make objects in your way disappear! Take a look at the two images that I shot of Liberty the eagle at the Audubon Nature Center. There is a fence that you must shoot through if you want to photograph her. Shooting at f/2.8 makes the fence so blurry that it vanishes from the photo and gives you a clean photograph of the eagle. If I shot the same shot at f/22 then you would be able to see faint lines where the fence exists but I would have had to shoot the photo for longer than 3 seconds in the lighting condition to get that shot and I didn't have my tripod with me so I didn't make the attempt. However, just so you can see what I was shooting through, I manually focused my lens until the fence was in view and the eagle became out of focus and took the same shot. It's amazing that I can make all that disappear by simply shooting at a very wide aperture.
There's a lot of science and "light bending" that happens when you change the way light enters your camera and we'll get into that later down the road. For now, set your camera to aperture priority mode ("A" or "Av" on your camera's dial) and start shooting to see how your camera reacts when you change the value of your aperture. By shooting in this mode, you are telling the camera that you will make the adjustments to the aperture but it is the camera's job to adjust the other two functions of the exposure triangle to get the correct exposure. This mode is used a lot when depth of field is important in your shot, such as in portraits or, in this case, making that fence disappear.
Next week I'm going to address topics that have been sent in by readers so make sure to email me now if you have something you'd like me to cover in this round.
Until next week, happy shooting!
Is there a topic that you'd like to learn more about? Send feedback, share your photos, or offer topic suggestions to talkphotos@ecklof.com. If you're looking for a place to connect with local photographers in Chautauqua County, search for the group "Shoot 'n Share Chautauqua" on Facebook.